Stripe integration setup
Setup
This guide assumes that you already have a Stripe account and you have set up card payment and fee acounts during your ERP setup.
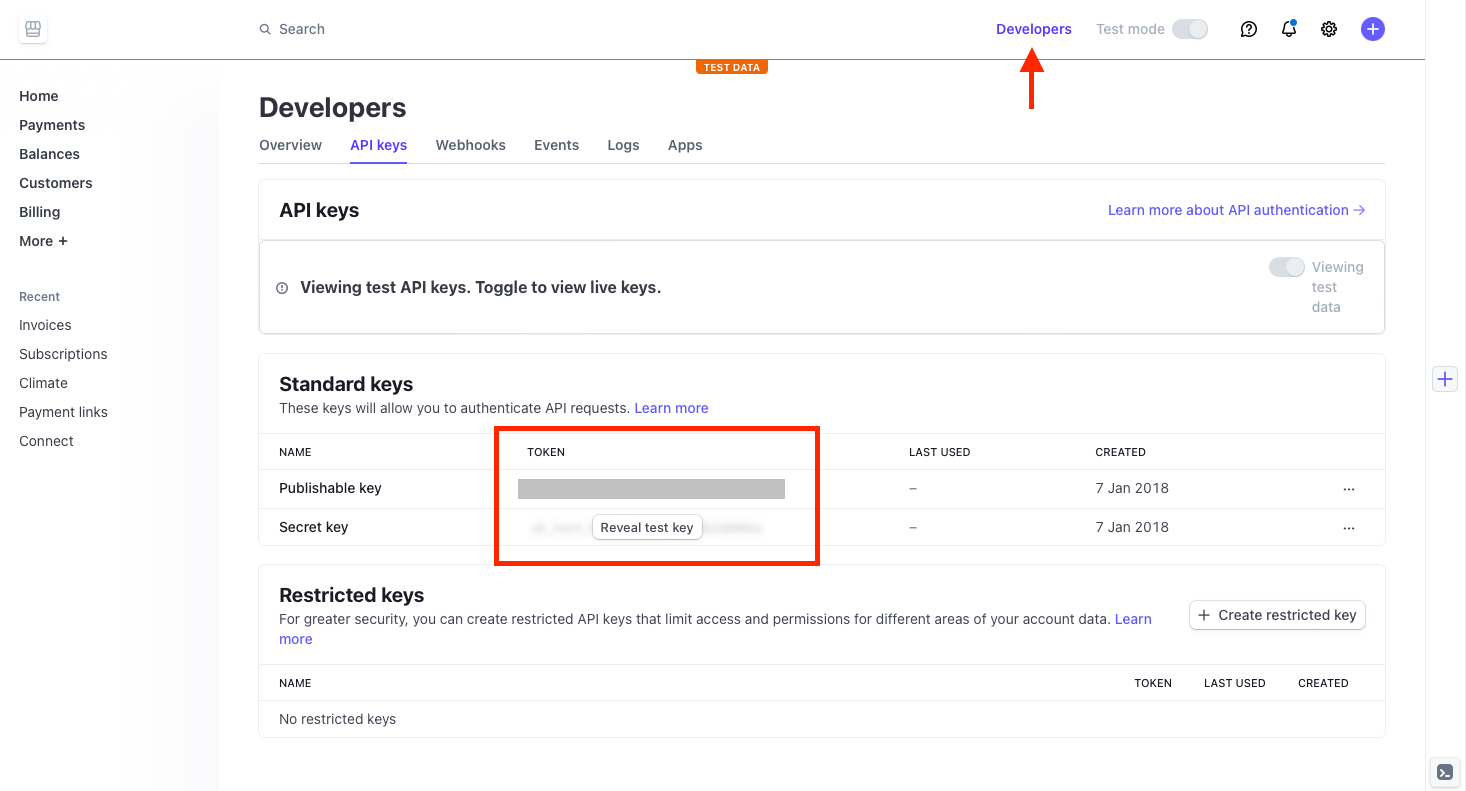
First thing you will need to do is to allow Fenerum to access your Stripe account. Fenerum integrates with Stripe using API Tokens.
You can find required keys in your Stripe Dashboard in the "Developers" settings tab.
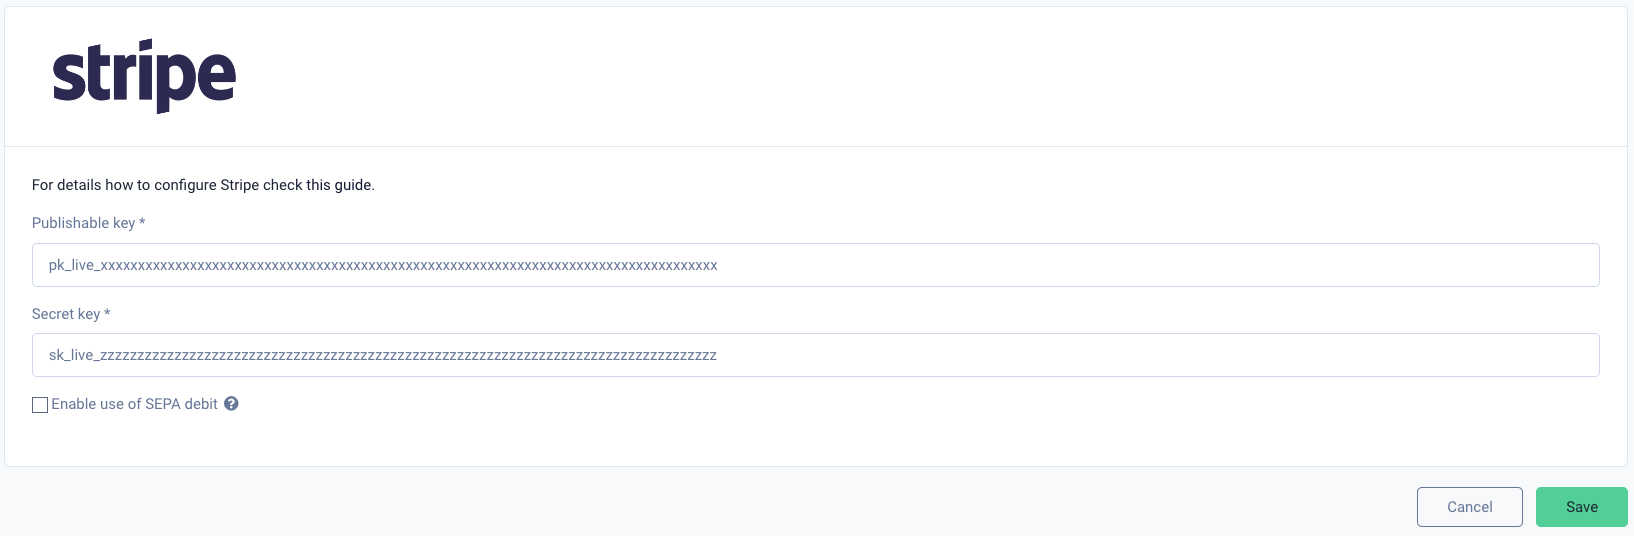
Once you have your publishable and secret keys head to Fenerum and go to the integrations settings tab. In the Payments section click on the configure button near stripe. Put the value of publishable key into Publishable key field and the value of secret key into Secret key field and click save.
Now you will need to attach a credit card data to your customer. Fenerum does not store sensitive credit card data, so the card needs to be created in Stripe and their id passed to Fenerum.
There are two ways of doing that:
- If you are handling cards creation in your backend you will only need to pass Stripe PaymentMethod ID to Fenerum using API call: Create a card using API. A detailed guide on integrating Stripe and Fenerum with your application can be found in the section Register payment cards in your application below.
- You can also make Fenerum take care of that. On how to do that please refer to this guide.
Existing data import
If you want to import existing credit card data into Fenerum follow this guide.
Register payment cards in your application
There are multiple ways to register your customers' payment cards with Fenerum. The most convenient and simple method uses a dedicated link that you can generate and send to your customer or redirect your user to. To read more on this topic please visit this guide.
When redirecting users from your application to Fenerum isn't your preferred way of collecting payment card data, please follow steps of this guide.
Create a Setup Intent in Stripe
Before displaying the payment card registration form you need to register a Setup Intent in Stripe. For a detailed description of supported parameters please refer to Stripe API guide.
The response data of Setup Intent creation endpoint contains the client_secret field which will be used for confirming payment card data with Stripe.
{
    "id": "seti_1Iuxae2eZvKYlo2CbFMPr2HY",
    ...
    "client_secret": "seti_1Iuxae2eZvKYlo2CbFMPr2HY_secret_JY3ikTrSjRl5hcEgfCvE0MMQUpCrk5s",
    ...
}
Display the payment card form in your web application
After obtaining the client_secret attribute of a Setup Intent we are ready to display the payment card registration form. We will use the Stripe Elements library from Stripe.js to do the heavy lifting. Any additional authorization steps, including 3D secure, are handled automatically by the library.
<div class="sr-form-row">
  <label>
    Payment details
  </label>
  <div class="sr-input sr-element sr-card-element" id="card-element">
    <!-- A Stripe card Element will be inserted here. -->
  </div>
</div>
<div class="sr-field-error" id="card-errors" role="alert"></div>
<button id="submit">Link your card to your account</button>
var stripe = Stripe(publicKey);
var elements = stripe.elements();
var card = elements.create("card");
var button = document.getElementById("submit");

card.mount("#card-element");

button.addEventListener("click", function(event) {
    event.preventDefault();

    stripe
      .confirmCardSetup(clientSecret, {  // client_secret from the previous step
        payment_method: {
          card: card,
          billing_details: { name: "John Smith" }
        }
      })
      .then(function(result) {
        if (result.error) {
          var displayError = document.getElementById("card-errors");
          displayError.textContent = result.error.message;
        } else {
          // The PaymentMethod was successfully set up.
          registerNewPaymentCard(
              result.setupIntent.payment_method
          );
        }
      });
  });
};
A complete example of front-end application is available in this repository.
Register Payment Card in Fenerum
The registerNewPaymentCard function used in the code sample from the previous step of this guide should send the newly created Payment Method ID to the backend of your application which should create a new Payment Card object in Fenerum using the API.
POST /api/v1/paymentcards/
Authorization: Token XXX
Content-Type: application/json
X-Client-System: MyAwesomeCRM
X-User: jsmith

{
    "account": "<Account.uuid>",
    "gateway": "stripe_new",
    "token": "<Payment Method ID>"
}
(Optional) Handle expired authorizations
Depending on the specific setup of a Payment Card, automatic payments authorization given by the card owner may expire. There are two ways of handling this situation:
- Fenerum sends an e-mail to Recipients of the Account owning this Payment Card. The message contains a link to a dedicated payment website in Fenerum. You can opt in for this behavior — feel free to contact our Customer Support to set it up.
- Fenerum notifies your application about the need for authorization and your application handles in its user interface.
If you prefer to handle expired authorizations in your application, you have to enable the payment.authentication_required Webhook. Once your application receives it you have to notify your customer and ask him to head over to your payment retry page.
Before displaying the page, you need to obtain the client_secret attribute of the failed Payment Intent by retrieving this Payment Intent. The identifier of this object is available in the webhook data in the payment_gateway_id key.
To trigger the authorization process we will again use the Stripe.js library.
var button = document.getElementById("submit");

button.addEventListener("click", function(event) {
    var stripe = Stripe(publicKey);

    stripe
        .handleCardPayment(clientSecret, {  // client_secret from the previous step
            payment_method: paymentMethodId,  // setupIntent.payment_method obtained in one of the previous steps
            setup_future_usage: "off_session"
        })
        .then(function (result) {
            if (result.error) {
                alert(result.error.message);
            } else {
                // authorization and payment retried successfully
            }
        });
});
Congratulations! You can use this new payment card as a payment method of your customer's subscriptions. 🙂
SCA
Starting in September 2019, a new regulation called Strong Customer Authentication (SCA) will require businesses in Europe to request additional authentication for online payments.
For Fenerum this means that payments with cards issued by European banks might require additional authentication (in most cases this will be 3-D Secure mechanism).
In such case Fenerum will send an e-mail with link to manual confirmation of the transaction and your are not required to do anything on that part.
This regulations also requires additional confirmation when saving card details for future usage. If you are using Fenerum link for grabbing card details then you are not required to do anything as updated form will support 3-D Secure on card input form.
Required changes
Only if you are using Fenerum API to add card using Stripe token then you will need to update your integration to handle Stripe SetupIntent instead of Card Token.
For details how to migrate refer to Stripe documentation.
From Fenerum point of view you will need to change your usage of PaymentCard create API call.
You will need to send Stripe PaymentMethod.id on the token field and set gateway to "stripe_new".
Example of old payload:
{
"account": "2a79956a-21fa-429c-b3d5-8e38c5e34afb",
"gateway": "stripe",
"token": "card_1EidxPFXVCQFEes0L0YQxWJy"
}
Example of new payload:
{
"account": "2a79956a-21fa-429c-b3d5-8e38c5e34afb",
"gateway": "stripe_new",
"token": "pm_1F9rgdFXVCQFEes0oaYqf8HO"
}
Note on backward compatibility
The old token will still be supported by Fenerum (with gateway type 'stripe'), but you should expect that every first payment using card registered with it will require 3-D secure authentication instead of authorising it during card save.
The same applies to old cards, you should expect that every first payment after 14th of September will require 3-D secure challange. Fenerum will send e-mails to your customers when the payment fails with link to provide 3-D secure details.
You might want to inform you customer about that.
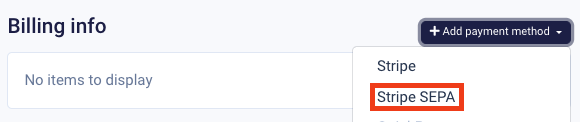
Use SEPA direct debit
SEPA compatibility
SEPA direct debit can be used only in certain countries (which are part of SEPA) and only to transfer EUR. For details check Stripe documentation.
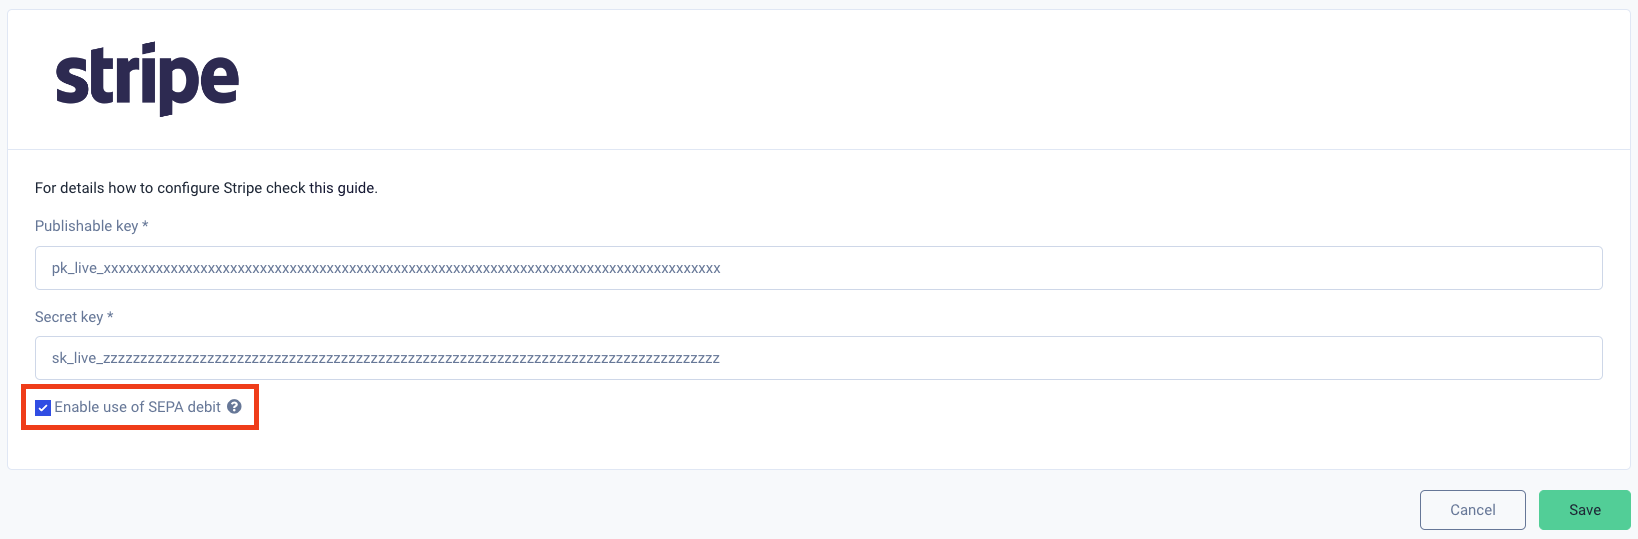
To use SEPA direct debit as one of billing methods you need to have Stripe integration enabled and configured SEPA as one of your payment method in Stripe dahsboard. Remember to not turn off sending SEPA related emails by Stripe or to handle them by yourself - Fenerum does not send emails about SEPA payments to customers to not double Stripe or your own integration with Stripe. Then you can enable use of SEPA by checking "Enable use of SEPA debit" on integration settings page. By checking this checkbox you are declaring that all necessary configuration on side of Stripe was completed.
Adding SEPA direct debit as a billing method is analogous to adding card using Stripe.