Accounts
Learn how to perform common updates to an account such as adding a credit card, setting up EAN invoicing, and more.
Adding credit card
Fenerum can generate a link for the dedicated page where your client can put their credit card data. You should send this link to your customers. This link will be unique per-customer.
This feature is also available as an API endpoint for programmatic use in your application backend. For further details please refer to our API Documentation.
To do so go to the account page for the client for which you want this link.
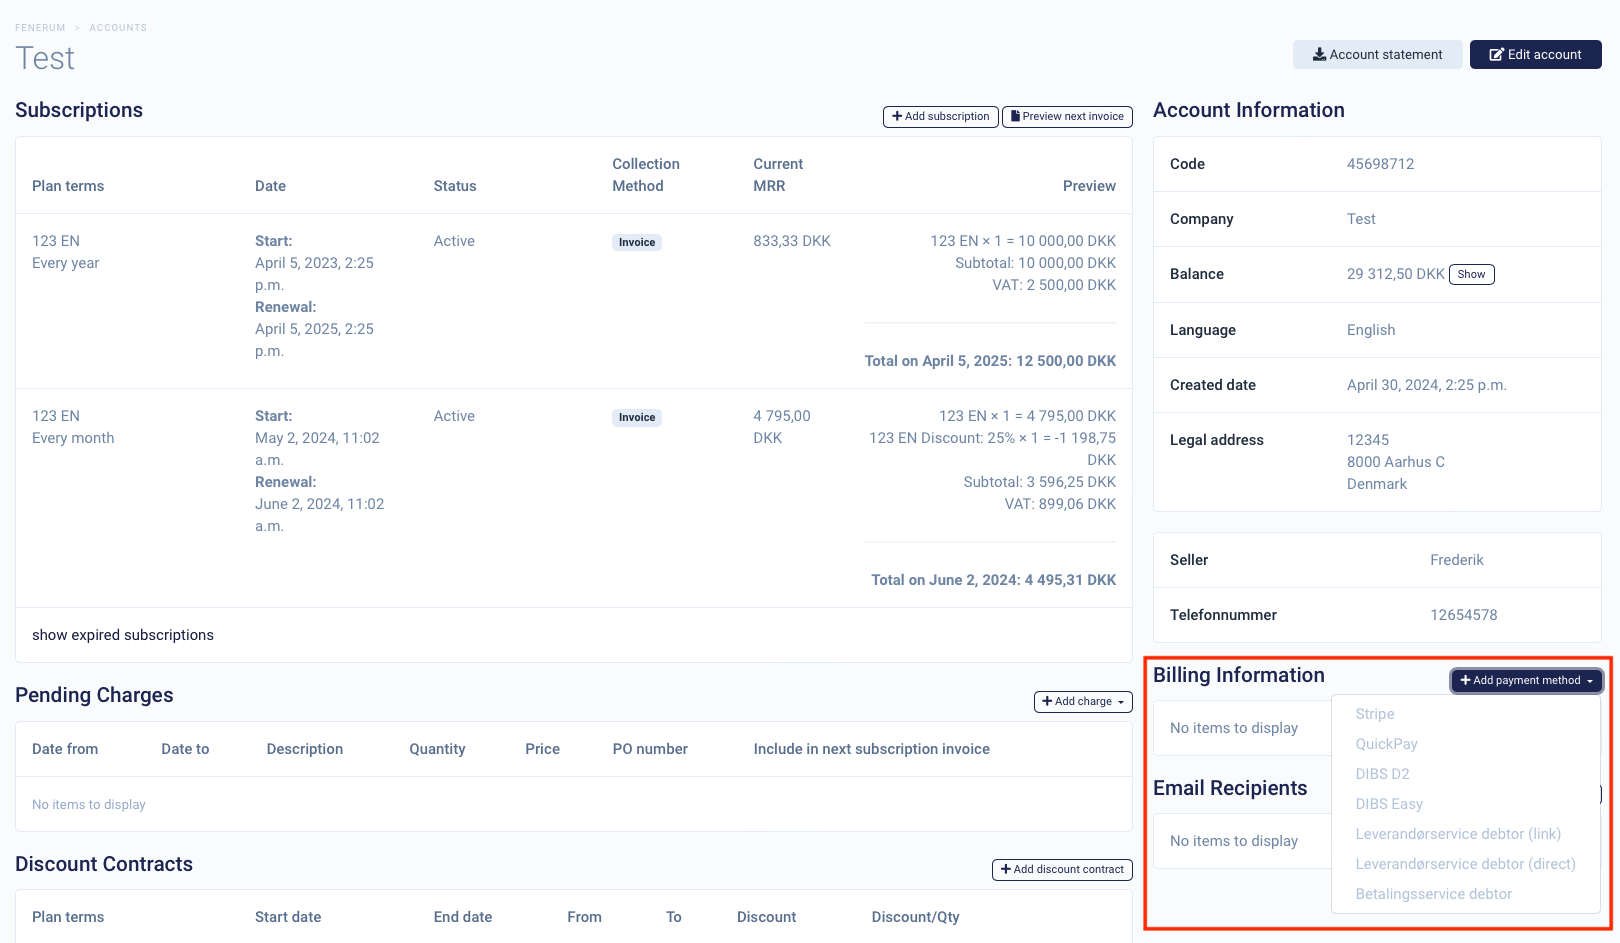
Under "Billing info" you will find a button "Add payment method". After clicking it you will need to choose your payment provider for which you want a link to be generated.

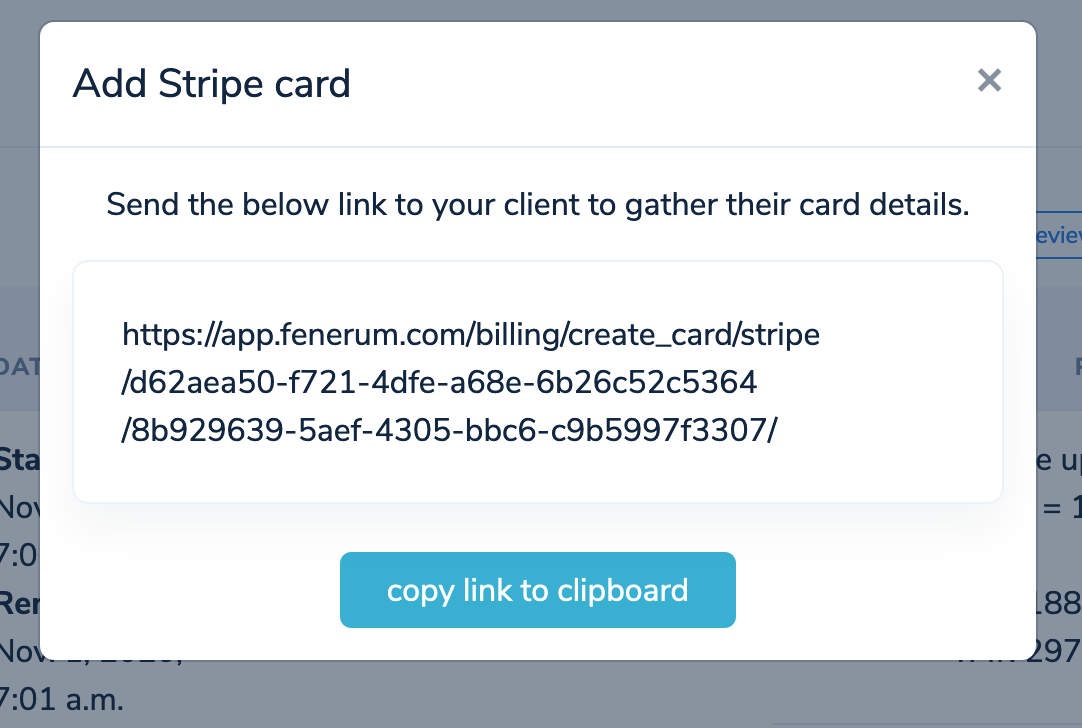
In the pop-up window you will find a link which you should send to your customer. After entering via this link the client will be able to put their credit card details into selected Payment Gateway and it will be connected to their Fenerum account. 
QuickPay
Note that for QuickPay customers you will also need to specify a currency that a relevant subscription will have. For more info about QuickPay integration see this guide.
Manually adding credit card
It is also possible to let your customers input their credit card information without an integration. Follow the below steps to do so.
Create an account
Go to accounts and click on New account + and fill in the customer information.
Add email recipients
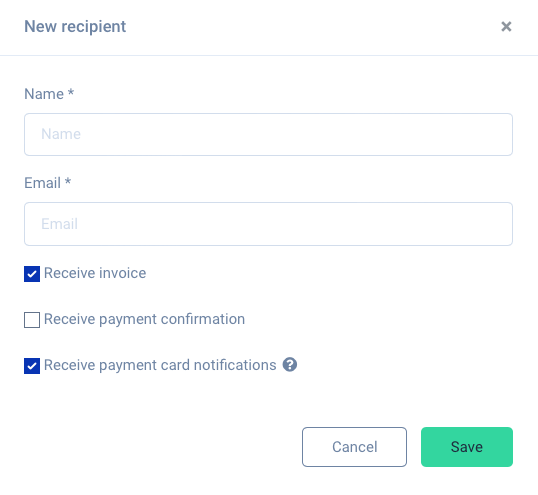
Click on + Add recipient below the account information and fill in the informations in the box. Remember to choose Receive payment confirmation. 
Send credit card input link to the customer
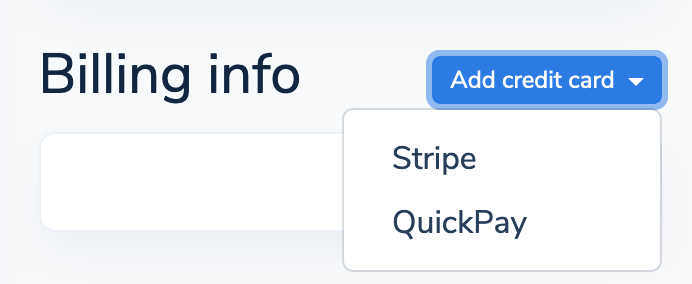
Click on the field Add credit card and choose card provider. When clicked the modal window will pop out with a link that you can copy. Send this link to your customer in an email. 
You will see the encrypted credit card information in the white field below when they are imported.
Start a subscription
Click on + Add subscription and fill in the information and click GEM. In any doubt the article "Subscriptions" will give you a step-by-step guide on how to add a subscription.
Multiple payment methods
Fenerum supports multiple payment methods for a single account.
When we collect payment automatically we will only try to charge with a payment method matching selected collection method for an invoice.
When using "pay now" you will be able to select payment method with type other than the one selected on an invoice.
There are multiple conditions on how we will try to collect a payment:
- we will always use active payment methods, if payment method is not active we will not try to charge it
- if there are more than one active payment method of given type, there is no guarantee which payment method will be used, but we will always use the same method on next payments
- if the payment fails we will try to charge with the next configured payment method of the matching type. For example, we will not try to charge with direct debit if the payment with a payment card fails
Validating VAT number
Fenerum will periodically validate an account's EU VAT number. If it is valid, it will be shown with a green checkmark next to the VAT number.

The validation is performed once every 30 days for each account within the EU.
An invalid EU VAT number can be caused by one of the following:
- the VAT number does not exist
- the VAT number has not been activated for intra-EU transactions
- the registration is not yet finalized (some EU countries require a separate registration for intra-EU transactions)
Electronic invoicing
Optional feature
Electronic invoicing is an optional feature and is not active by default. Please contact us at support@fenerum.com if you would like to use this feature.
Setup
Electronic invoicing is enabled by accessing the account page and clicking on Edit account, from which you must tick the Electronic invoicing-checkbox.
Depending on the country of the account, different options for "E-Invoicing identifier schema" will be shown in a dropdown menu below the "Electronic invoicing" checkbox. Choose the correct schema for the account and click Save. Below is a description of the different schemas.
E-Invoicing identifier schemas
GLN
This option can be chosen when issuing electronic invoices to accounts from DK, GL, or FO.
It requires you to enter the account's GLN number, from which this will be used to send electronic invoices to the account.
Organization number
This option will use the account's legal VAT number to send the electronic invoice. This can be used in scenarios where the account is from a country that does not support GLN, or if the account has not registered a GLN.
Please note that the electronic invoice will fail being sent if the account's legal VAT number is not valid or incorrectly formatted.
Formats
Fenerum supports a variety of document formats for electronic invoicing. The format is chosen automatically based on the country of the account and organization issuing the invoice.
OIOUBL
This format is used when sending an electronic invoice to an account from DK, GL, or FO.
The electronic invoices sent using this format will always include the account's legal VAT number, regardless of the E-Invoicing identifier schema chosen.
Peppol & EHF
This format is used when sending an electronic invoice to an account from NO.
Final considerations
It's crucial that you provide your bank account information in the invoice footer. The invoice won't be sent without them. You can configure your invoice footer in the Invoice settings.
Please note that when using the electronic invoicing feature, an email with the new invoice/credit note will not be sent out to the account's recipients. The invoice will be attached to the electronic invoice when possible.
If you have a lot of accounts to update you can of course use our API to automate this process.
Recipients
You can read about recipients and how they can be configured and used here.
Delete or archive an account
You can delete accounts that have no activity at all. To do so, go to the account detail page, click "Edit account" and then "Delete account".
Important
When you delete an account, all data related to the account will be permanently deleted. This action cannot be undone.
If the account has any activity, you can archive it instead. To do so, go to the account detail page, click "Edit account" and then "Archive account". An archived account will not be visible in the account list, but you can still see it by removing the "Archived" filter.
Important
Note that archiving an account only filters it out from the account list. All data related to the account will still be available in the system. Any active subscriptions will not be cancelled.
If you want to restore an archived account, you can do so by clicking "Edit account" and then "Restore account".
